
In the previous post you could see how to parse a packet and construct a complex data type from it by creating a set-returning function. This function returned a table of rows, but it did not insert it into the database. In this post you will see how to insert the data into the database using the server programming interface (SPI) that PostgreSQL provides. The goal is to take the data points sent to the server and insert them into tables. The post is quite long, so there will be a few follow-up posts discussing various improvements to make it more stable and efficient, which will also introduce a few more useful interfaces and functions.
For example, if these lines are received, they should be inserted into the database.
system,host=fury load1=2.13,load15=0.84,load5=1.18,n_cpus=8i,n_users=1i 1574753954000000000
system,host=fury uptime=607641i 1574753954000000000
system,host=fury uptime_format="7 days,  0:47" 1574753954000000000
Each data point will be inserted into the table with the same name as the measurements, so in this case, all the data points will be inserted into the table system. InfluxDB itself inserts the data into three different columns—_time for the timestamp, _tags for the tags, and _fields for the fields—and the same conventions are used here. In other words, the assumption is made that _time will be a column in the table system with a type suitable for a timestamp and the _tags and _fields columns are JSONB types. In the event that the a column by that name does not exist, that data will just be ignored, and if the table does not exist, the entire data point will be ignored. As a result, the above lines will be translated to the following SQL code, which is executed by the background worker:
INSERT INTO system(_time, _tags, _fields) VALUES
  (to_timestamp(1574753954.0), '{"host": "fury"}', '{"load1": "2.13", "load5": "1.18", "load15": "0.84", "n_cpus": "8i", "n_users": "1i"}'),
  (to_timestamp(1574753954.0), '{"host": "fury"}', '{"uptime": "607641i"}'),
  (to_timestamp(1574753954.0), '{"host": "fury"}', '{"uptime_format": "7 days,  0:47"}');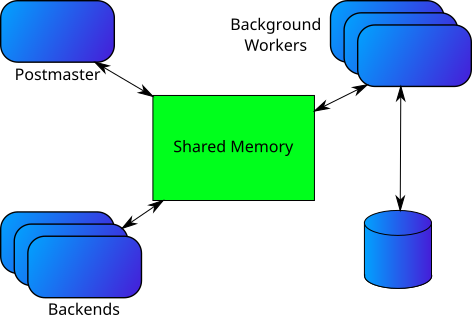
You already saw in the previous posts how to create a result type with the data above, but in this post the SPI will be used to inspect the tables and decide what columns that exist and construct a matching insert statement. Note that at this point, the tag and field values are treated as strings when constructing the JSON, but the code will be expanded in the following posts to be smarter both with regards to how the columns are used and converting the strings to appropriate types. In this post, the focus will be on establishing a connection to the database and executing statements through the SPI, with a brief look into how to handle types since this is something that will be used in the next post.
If you recall the diagram from the post It’s all in the Background you saw that the database actually consists of a bunch of processes that communicate. What was missing from that picture is how the processes are communicating and if you look in Figure 1 on the left, you see a more complete diagram describing how the processes are connected. All the processes access a shared memory region and communication between the processes are usually through this (there are a few exceptions, to be covered in future posts). When interacting with the database, you actually write data to the shared memory region which is then moved to disk by separate processes.
The steps to start a background worker was briefly covered in the post mentioned above, but to allow access to the database, a few more steps are needed. Here is a brief recap of the steps to start a background worker with the steps to get access to the database added.
- Initialize the worker structure and configure it for database access
- Tell the postmaster to spawn a new background worker.
- Establish a connection to the database in the background worker process.
- Establish a transaction context before execution of statements in the background worker process.
- Build and execute SQL statements.
Configuring the background worker for database access
To make the interaction with the shared memory easy, the Server Programming Interface (SPI) was introduced into PostgreSQL and this is what the background workers and backends are using. To attach to the shared memory and use the SPI, it is necessary to set the flags BGWORKER_SHMEM_ACCESS and BGWORKER_BACKEND_DATABASE_CONNECTION in the backend worker configuration. This is done by setting the bgw_flags argument of the BackgroundWorker structure to the bitwise-or of the two flags.
memset(worker, 0, sizeof(*worker));
/* Shared memory access is necessary to connect to the database. */
worker->bgw_flags =
    BGWORKER_SHMEM_ACCESS | BGWORKER_BACKEND_DATABASE_CONNECTION;
worker->bgw_start_time = BgWorkerStart_RecoveryFinished;
worker->bgw_restart_time = BGW_NEVER_RESTART;
As mentioned in It’s all in the Background one of the drawbacks with a multi-process system (as compared to a multi-thread system) is that it is necessary to explicitly set up shared memory access and the flag BGWORKER_SHMEM_ACCESS instructs PostgreSQL to connect to the shared memory of the server. The BGWORKER_BACKEND_DATABASE_CONNECTION flag is used to tell PostgreSQL to set up signal handlers that are needed to communicate with the background worker.
Since the BGWORKER_SHMEM_ACCESS flag is necessary to communicate with the rest of the system, a reasonable question to ask is then why is not the this flag always set? After all, setting up the shared memory is only done once and it shouldn’t affect the execution in any significant way and always doing this would reduce the cognitive load for the implementer of the background worker. Well… apart from the fact that it would mean unnecessary work being done (which is minor, but anyway), it will allow the postmaster to distinguish between processes that could have corrupted the memory in the event of a crash—those that have access to the database server shared memory—and those that could not. So, if the flag is not set, PostgreSQL will not restart if the background worker crashes, but if the flag is set, it will have to restart to be sure that no shared memory have been corrupted.
The reason for the BGWORKER_BACKEND_DATABASE_CONNECTION flag is a little simpler to motivate: it is needed to set up signal handlers in the correct way, for example, so that an interrupt will cancel any statement in progress. If the backend worker is not processing statements, this is not necessary and would actually require the user to disable these signals, so it is more convenient to provide a configuration flag for this.
Create a connection for database access
The flags given above are needed to start the background worker, but once the background worker has started it will not automatically be connected to the database even though the postmaster assumes that it will do so. To connect the background worker to the database backend, it is necessary to use the BackgroundWorkerInitializeConnection or BackgroundWorkerInitializeConnectionByOid. In this case BackgroundWorkerInitializeConnectionByOid is used since the database OID is passed down to the background worker through the bgw_extra field.
/* Establish signal handlers; once that's done, unblock signals. */
pqsignal(SIGTERM, WorkerSigterm);
pqsignal(SIGHUP, WorkerSighup);
BackgroundWorkerUnblockSignals();

BackgroundWorkerInitializeConnectionByOid(database_id, InvalidOid, 0);
Note that this is done after the signals are unblocked. You should not delay unblocking the signals more than necessary and the background worker should react to SIGHUP and SIGTERM as soon as possible to be able to function correctly. An incomplete list of things (that will be covered in future posts) that the BackgroundWorkerInitializeConnection function does is:
- Add the process structure of the background worker to an internal list of available PostgreSQL processes called
ProcArray. - Initialize the shared cache invalidation system.
- Configure all caches: the relation cache, the system table caches, and the plan cache.
- Configure some useful global variables available for background workers.
- Set
MyBackendIdto a unique integer for the backend. - Set
MyDatabaseIdto the database OID of the connected database. - Set
MyDatabaseTableSpaceto the default tablespace of the database. - Set
MyProcto the process structure for the background worker. - Set
DatabasePathto the path of the database relative to the data directory of the server.
- Set
A few more things are done as part of this step, but they are quite internal so they are skipped for now. Some of these steps can potentially block or take a long time to execute, which is the reason to why the signal handlers are set up immediately but the rest of the initialization is executed after signals have been unblocked. This will allow the background worker to react to signals even during the initialization.
I’m actually a little surprised that you need to call BackgroundWorkerInitializeConnection after you have started the background worker and I am not sure why this is not done. It would reduce the cognitive load of an implementer and would also make it very clear what needs to be provided to start a background worker, further reducing the risk of introducing bugs. Since the BGWORKER_BACKEND_DATABASE_CONNECTION flag is provided, the postmaster knows that the initialization is needed. There are some additional parameters added to BackgroundWorkerInitializeConnection which allow you to pick user and database, but that can be provided with the BackgroundWorker structure when registering the backend. The potential problem is that the background worker starts with signals blocked and installing the signal handlers is part of what is done to start the background worker. All this could, however, be added to the configuration for a background worker as required parameters, hence would provide a better API for the background worker developer.
Establish a transaction context for statement execution
Once the backend worker is configured to use the database backend, it is possible to access it, but that is not sufficient. When performing modifications of the database it is necessary to have a transaction started and also to have memory context set up correctly for the execution.
if ((err = SPI_connect_ext(SPI_OPT_NONATOMIC)) != SPI_OK_CONNECT)
  elog(ERROR, "SPI_connect failed: %s", SPI_result_code_string(err));
SPI_start_transaction();
PushActiveSnapshot(GetTransactionSnapshot());
        .
        .
        .
PopActiveSnapshot();
SPI_commit();
if ((err = SPI_finish()) != SPI_OK_FINISH)
  elog(ERROR, "SPI_finish failed: %s", SPI_result_code_string(err));
First, you need to open a connection to the server using the SPI_connect_ext function. Normally, you can use the SPI_connect function, but in this case we need to set up a non-atomic context—that is, a transactional context—since we will be executing several commands as part of inserting data into the table. More about that in a minute. This will set up the proper memory context for the work and also initialize some structures that are used to track the execution state.
Second, you need to start the transaction, which in this case is done using SPI_start_transaction. This will mark the process as being inside a transaction but not really do anything else, so it is quite cheap to execute.
Third, you need to set up a snapshot for the reads and writes that you are going to execute, which is done using PushActiveSnapshot. Here we use GetTransactionSnapshot so that the transaction that is being executed will see a snapshot of the data as it was at the start of the transaction. How snapshots work and what their purpose is a big topic and probably something to be covered in a future post, but for now, you can see it as a frozen view of the database as of a point in time.
When terminating the transaction, the opposite is done: pop the active snapshot, commit the transaction, and finish the connection to the server.
Build and execute statements
Once a transaction context is established, you can start executing statements. There are a few different ways to execute statements using the SPI, the most common one (or at least the simplest to use) being SPI_execute. With SPI_execute, you can pass in an SQL string and it will be parsed and executed inside the transaction.
ret = SPI_execute("INSERT INTO foo SELECT * FROM bar", false, 5);
if (ret != SPI_OK_SELECT)
  elog(FATAL, "SPI_execute failed: error code %d", ret);
You can both execute utility statements that do not return any rows, but also execute statements that return result sets. In this post, the focus will be on inserting data into tables, so how to read result sets is not part of this post. The full code for reading the data points, creating an SQL statement from it, and executing the statement looks like this:
static void ProcessPacket(char *buffer, size_t bytes, Oid nspid) {
ParseState *state;
buffer[bytes] = '\0';
state = ParseInfluxSetup(buffer);
while (true) {
StringInfoData stmt;
Jsonb *tags, *fields;
int err;
int64 timestamp;
if (!ReadNextLine(state))
return;
/* If the table does not exist, we just skip the line silently. */
if (get_relname_relid(state->metric, nspid) == InvalidOid)
continue;
/* If the timestamp does not parse, we just skip the line silently. */
if (!scanint8(state->timestamp, true, ×tamp))
continue;
tags = BuildJsonObject(state->tags);
fields = BuildJsonObject(state->fields);
initStringInfo(&stmt);
appendStringInfo(
&stmt,
"INSERT INTO %s.%s(_time, _tags, _fields) VALUES "
"(to_timestamp(%f),%s,%s)",
quote_identifier(get_namespace_name(nspid)),
quote_identifier(state->metric), (double)timestamp / 1e9,
quote_literal_cstr(JsonbToCString(NULL, &tags->root, VARSIZE(tags))),
quote_literal_cstr(
JsonbToCString(NULL, &fields->root, VARSIZE(fields))));
/* Execute the plan and log any errors */
err = SPI_execute(stmt.data, false, 0);
if (err != SPI_OK_INSERT)
elog(LOG, "SPI_execute failed executing query \"%s\": %s", stmt.data,
SPI_result_code_string(err));
}
}In the code above, there are a few things that you should observe.
After reading a data point, there is a check if the table exists using get_relname_relid. If it does not exist, the data point is skipped. The get_relname_relid need to execute in a transaction context, so it cannot be used if you haven’t set up a proper transaction. The function takes a table name, an OID to a namespace (the schema for the tables that is written by the extension) and returns an OID of the relation. If the relation does not exist, it returns InvalidOid (which happens to be zero).
The to_timestamp function is used to convert the epoch to a proper timestamp. This function takes a float that is the number of seconds since the epoch, and it can take fractions as well, so just converting to a double and dividing by 109 does the job.
In order to avoid SQL injections, the identifiers are quoted using the quote_identifier function. This makes sure that a metric name like “Robert’); — DROP TABLE Students;–“ is not used unquoted in the SQL code, causing havoc. In this case, it might be a little paranoid, but it is good practice to always quote the identifiers.
For similar reasons, we quote the JSON data converted to string using quote_literal_cstr. This takes a string, quotes it properly as a string, and also converts the rest of the string so that it is a proper SQL string.
Wrapup
You now have code that works, but there is a number of problems with it. The code is highly inefficient, and also contains a few possible bugs that could cause problems in a real application.
- If the table definition is not correct, the log will be filled with error message about non-existent columns, which is annoying, but also a performance problem since a lot of time is wasted on this. It would be better to don’t try to execute statement that have no chance of succeeding.
- Converting the JSONB to a string and than back to JSONB internally is wasting a lot of CPU. We have already built up the JSONB, so it would be good if we could just insert it directly.
- Calling a function for each data point is also inefficient. The internal representation of the timestamp is microseconds since the PostgreSQL epoch, so first converting it to a string, calling a function, and then converting it back also wastes CPU.
- Running the parser for each statement is not necessary so it should be possible to save time here as well.
You know know how the server programming interface work for simple applications, but there is a lot more you can do to check table definitions and tailor the statements to the actual table definition. In the next few posts, you will see how to eliminate the performance problems above and also learn how to use the SPI for table inspection.

Comments